Monday, May 28, 2012

Memorial Weekend Projects... Oh Yeah!

I have always held this weekend as the "first" summer weekend.  Instead of joining the hassle of traffic and fighting to get a camping spot, we chose to stay home.  We did a lot of yard work and got a few major projects completed outside. 

I finally got my Wisteria "tree" and planted it in the front yard.  I am going to train it over an ornate arch that I found.  It will take a few years for it to take shape, but in the meantime I get to enjoy the sweet smell of the blossoms.  I also got my garden out of the green house and in the ground outside.  I really down sized our garden this year.  I usually have five 8 x 8 raised beds and one 8 x 16 bed fully packed with goodies.  This year, I only planted one of the 8 x 8 beds.  There is just way to much to do this summer  and tending a garden is not one of them.  Once the yard work was under control, I hit the scrap room.  I got several projects finished over the weekend and feel like I have accomplished so much.  My Mind is in the right place now and I can forge ahead on other projects that I have been putting off.  Taking time to play and do what you want to do is so good for the spirit.

This is the first of my projects.  All of these items I found while out scavenging around Goodwill or at Pole Barn PrimitivesLisa always has something there I can play with... I think she likes to see me come in because I very rarely leave without buying something.  (She will not however, sell me her dog. Some things are just not for sale..lol)
This is a little 2 drawer shelf I found while at Lisa's store and ti was perfect for hanging my apron's on.  It was bare and plane, so I changed it up and little bit.


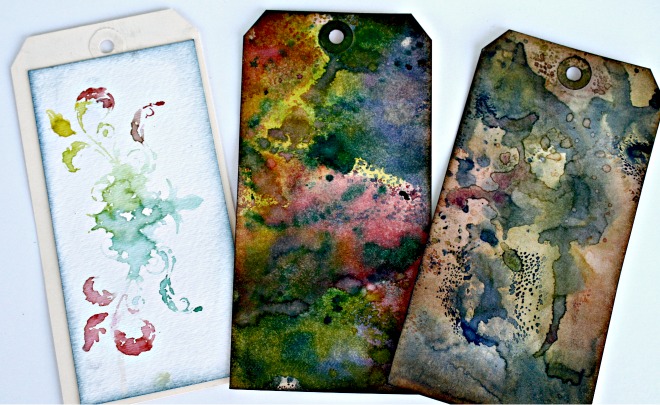
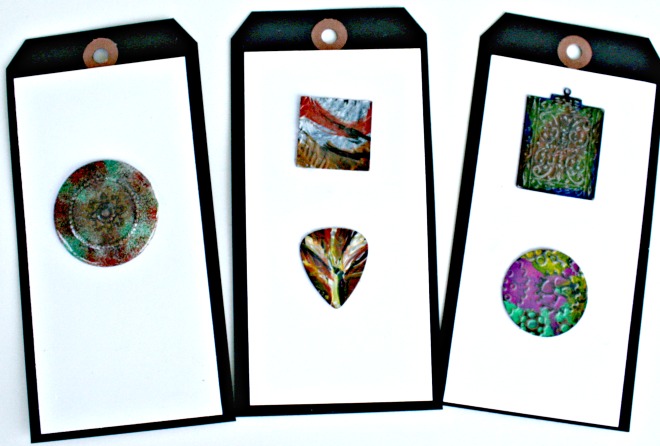
This next project was something I have wanted to do for a long time.  As simple it is, it just never got down until this weekend.  I have several tags that I have on rings and they are samples of ink colors or samples of "how too's"  and I keeping looking around for them.  They are never in the same place and usually buried under some other project (mess) that I have in the scrap room.  Not any more, they are save and secure and all in one place now.    Yeah for me!!!


Now they hang on the wall above my work desk and they are easy to reach and find.  Whew!!!
This last project was a bit more involved.  Once again, Pole Barn Primitives has a goodie that I just had to have and make something pretty out of it.  This 2 drawer chest was a bit rough around the edges and needed a little bit of TLC.  Once I got the "20 pound" monster removed off the back, I could actually lift this darn thing without hurting myself.  Craziest thing, someone used a 1.5 inch of very heavy wood for the backing.  It went all the way to the floor.  Made no sense to me why you would have a back that heavy and it going all the way to the floor. If you look real close at the picture, you can see it.


So, once that back was off, I spent quite a bit of time sanding down the top, sides and drawer fronts to remove as much of the green paint as I could.  Then I took it outside and painted it ivory white.  Next step was remaking the back out of thick chipboard.  I nailed it in place using tiny tack nails and from there I reworked each side and used some favorite paper I have in my stash from Graphic 45.  I so love Graphic 45!!!.. They have the coolest paper lines and we carry some of them in the store at The Hens' Den
Ok.. Ok...here is the new front of the chest:


Different looking, isn't it!.. I think it is so cool. Here are a few more pictures of this cute little chest:


The top left photo is the left side of the chest.  The top right photo is the right side of the chest.  The next photo is the top and the last picture is the back of the chest.  I used Claudine Hellmuth's Studio Extra Time slow-dry medium to adhere the paper to the chest.  After that layer dried, I layered the other papers and embellishments next.  Then I used the same medium over all the paper and embellishments to give it a sheen.  I did not go over the feather. While the medium was wet I layed the feather down onto the paper and as the medium dried, it held the feather in place.    The paper line is Graphic 45's Tropical Travelogue Collection.  What fun paper!!!


So, digging a 3 foot by 3 foot hole for my Wisteria tree, moving the starts out to the garden and playing in my scrap room, I feel so good inside.
I am ready for anything now.  Bring it on!!!!

Thank you for stopping by!


Wednesday, May 23, 2012

Bo Bunny - Country Garden Layout

As a new Grandma to a beautiful Grand Daughter, I am finally getting to play with pink colors and flowers.   Autumn is 5 months old and is already learning to be a camera ham.  I made her Mom an album when she was born so that she could document the first year, each and every month.  This is month 5.   All of the pictures feature Autumn in a frilly outfit and I love it.  She has the biggest eyes and seems to be looking right at you.   


Layout using Bo Bunny's Country Garden Paper line and embellishments, along with Petaloo's Color Me Crazy Chipboard pieces.

1 - I used as my base Tim Holtz's Distress Sage Card stock.  I distress the edges to add some
                                                                                     character
2 - The next layer was Bo Bunny Country Garden Vines, but I used the reverse side.  I cut one inch off so that the paper would be framed by the card stock
3 - Using one of  Martha Stewart's floral punches, I punched along the outer edge  and taped it down onto the card stock

4 - I layered the picture on pink card stock and then framed it in with Cream Satin pleated ribbon from Maya Road

5 - On the left side, I place a half circle of cream colored crocheted daisy's from Maya Road.  In the center of them I  glued on the little gems from the Country Garden Line.  Next, I glued the daisy's in place. 

6 - Using Petaloo's Color Me Crazy Chipboard Small Frames, I cut the smalles of the frame set into 2 pieces.  I then used paint (Adirondack Shell Pink) and colored them.  While the paint was wet, I covered them with clear embossing powder and used my heat gun to dry them.  Then I taped them in place using Scor-Pal double sided tape

7 - Using Petaloo's Color Me Crazy Chipboard Butterflies, I colored them using Perfect Pearls and then added the gems from the Country Garden line. On the larger piece, I painted the circle and flower and again used embossing powder to give them a nice shine (I over heated them a bit, so be careful of this)

8 - Using the Country Garden Deminsional Stickers, I layered along the bottom of the layout around the Petaloo Butterfly. 

9 - Next, I used the Heaven Sent Card Stock Sticker phrases on the left side

Products used:


Thank you for stopping by

Wednesday, May 9, 2012

Ranger U - May 2012

WOW.. What an experience.   You go through such a roller coaster of emotions when you start this endeavor.  From the time I completed and submitted the application to the very end when you get your class photo.   But I made it.  Whew.......

Last fall when I applied, I did not think I had a snowball's chance in hell to get selected to go.  They only pick 24 students for each class each year.   There are two of them, late April and early May.  Then you wait until late March for the email...Yes...No.   I got the one that said "CONGRATULATIONS".  I was in shock, totaly.  Yes, I sure was.  Still am.   But the journey has only just begun.

Booking the flight and hotel was "ok"... took a bit to find a flight that would get me to NJ at a decent hour.  Sea Tac, however, have some rude TSA agents.  Honestly, I do not travel much and I forget the "finner" details about traveling.  So when I thought I would travel "light", I thought I had my plan all organized.  Usually when I fly, I check ALL of my bags because I hate waiting for all the sillies to put their over stuffed carry-on's in the overheads.  So, I get to security, unload my laptop (I knew to do this) took off my shoes (knew to do this) and put everything in plastic bins (knew to do this).   Watch my luggage/laptop go in the machine and they never came out!!!!  The next thing I hears is "LUGGAGE CHECK"  and still not understanding and waiting for my bags, the TSA dude came up to me WITH my bag and asked if it was mine... Yes Sir, it is??!!!  Well, we have a lesson to learn, he says'.  Taking all the stuff out of my bag (in front of everyone, who are by now all watching me) and lays out my plastic bag of hair stuff, tooth paste and so on.   Well...Did you know you are suppose to take this bag OUT of your luggage?   No Sir, I do not really fly that much and rarely take carry-on luggage, why?  "These bottles are not legal"  WHAT!!!... Oh shoot... "do you want to toss them or check the bag?"   me- "I paid good money for that stuff and I am not tossing it"...he- then you have to check it.  me- then you put my stuff bag in my bag and I will.. by now I am getting upset and he is being a turd and everyone is staring... So he walks me out of security, holding my bag for everyone to see and does not even give me a kiss when he is done.  I was so embarrased.  Jerk.. bag checked and I finally get on the plane.
5 + hours later, we landed. Had a nice ride to my hotel, time to check in.   OH MY GOSH!!!!!!  She asked for my ID.. I had it in my pocket.  Where is it?  As I tear through all my stuff,  GONE!  Crap, the last time I saw it was when I check in my bag.   UGH... then my brain flashed.. I called United and asked them if they could check the seat I was sitting in because I may have left it there because I vagely remember something dropping in between the seats.... "no, they will not take out the seats to get My Driver licenses".  How do I get back on the plane, I ask.   The response was not what I wanted to hear.  Called my husband and he is in a panic.. Wife stuck in NJ!!!... then I my heart hits the floor.... WAIT.... I run to my wallet and peak in a secret place and there is my PASSPORT!!!...  I started to cry... day saved.

Ok, The next 3 days are very intense and jammed packed full of information and skills and tricks and secrets.  I made 80 tags over those 3 days, using a varitiety of techniques.  You arrive at 9 am sharp and you are there in class until 6 pm...long days.  

Day 1 - We got a tour of the plant.  They make everything there.  All by hand, with some help from machines of course. Those Distress ink pads, they are put together by hand! Not a machine.  Boy did those girls have some pretty fingers. Darn good thing they had gloves on. What fun, I got to pick a bottle of stickles right off the assembly line..Whoo Hooo!   Ok, tour over we have to get to work and start making our tags.  Some of the tags are shown below.

Perfect Pearls - I did not know that you could do so much with this beautiful fine powder. My favorite in this section was the Faux Suede tag. It looks and feels like leather and the colors on the paper are just beautiful.


 Shabby chic embossing with paint...I want to try this again.

 Altering metal and the embossed foil was so cool!

 Layering inks- stepping out of my color pallet....FUN!

 Grunge, foil and layering inks....I want to play!!!

 More foil and tranfer and sticky back canvas (my fav was the canvas, far right)

 Ink washing - this is a must do again.

 Distress markers and embossing powders - love altering things!!!

 Dylousions Sprays - Oh So Pretty!!!!

 Glossy Accents and colloage art - reminds me of school when I made the heart.

 The Melting Pot and Utee!!!-   My new best friend!

 Stickles and Liquid Pearls -  LOVE!


My most fav of all - altered metal art.  Using the Melting pot is going to change my neckline alot...lol

I cannot leave out all the fun we had and the food!... Mario took really great care of us. Square pizza was on the agenda this day and the salads were awesome!
Then, there are the great people that you meet.  I was not able to get all of their pictures, I had my head buried in projects.   :(
 Kaz - she loves her "stashes" and I love her accent.  She is from England.  She taught me a word..."gobsmacked" = I am over whelmed/blown over.  There was another one but I best leave that one in my head...lol
 Kate, Dy and Kaz being silly- The 3 amigos!

 Alain, one of the owners took a bath in yellow stickles and this is what the coat looks like.  It is stiff as a board and they are protecting it carefelly...it is really funny to see.  He was wearing when they dumped the stickels on him....lol

 Tim and Claudine teaching- Tim is such a ham and there is a very funny side to him.  It took all I had to hold back those 3 days.  Especially when he started talking about his "cracks".  Claudine  is so sweet and gental but don't let those looks fool you, she is one sharp cookie!

Dy teaching - she is a hoot.  I did not know what to expect but I loved her personality.  She is whitty and funny and very sincere.  Love her!

After 3 long and very intense days of learning, it was time to leave and I almost cried.  I wanted to stay and learn more.  But it was time to take the final picture:
Ranger U Graduating Class of May 4 - 6 2012 @ Ranger Ink in Tinton Falls; New Jersey.  I cannot tell you have much I really enjoyed myself.

Thank you for stopping by... Have a great day!